PBR Fundamentals
Normal Map vs Bump Map
Choose a normal map for portable RGB surface directions. Keep a bump map when your shader accepts grayscale height or you still need editable relief. Neither changes silhouette.
Generate a normal map · Compare the evidence
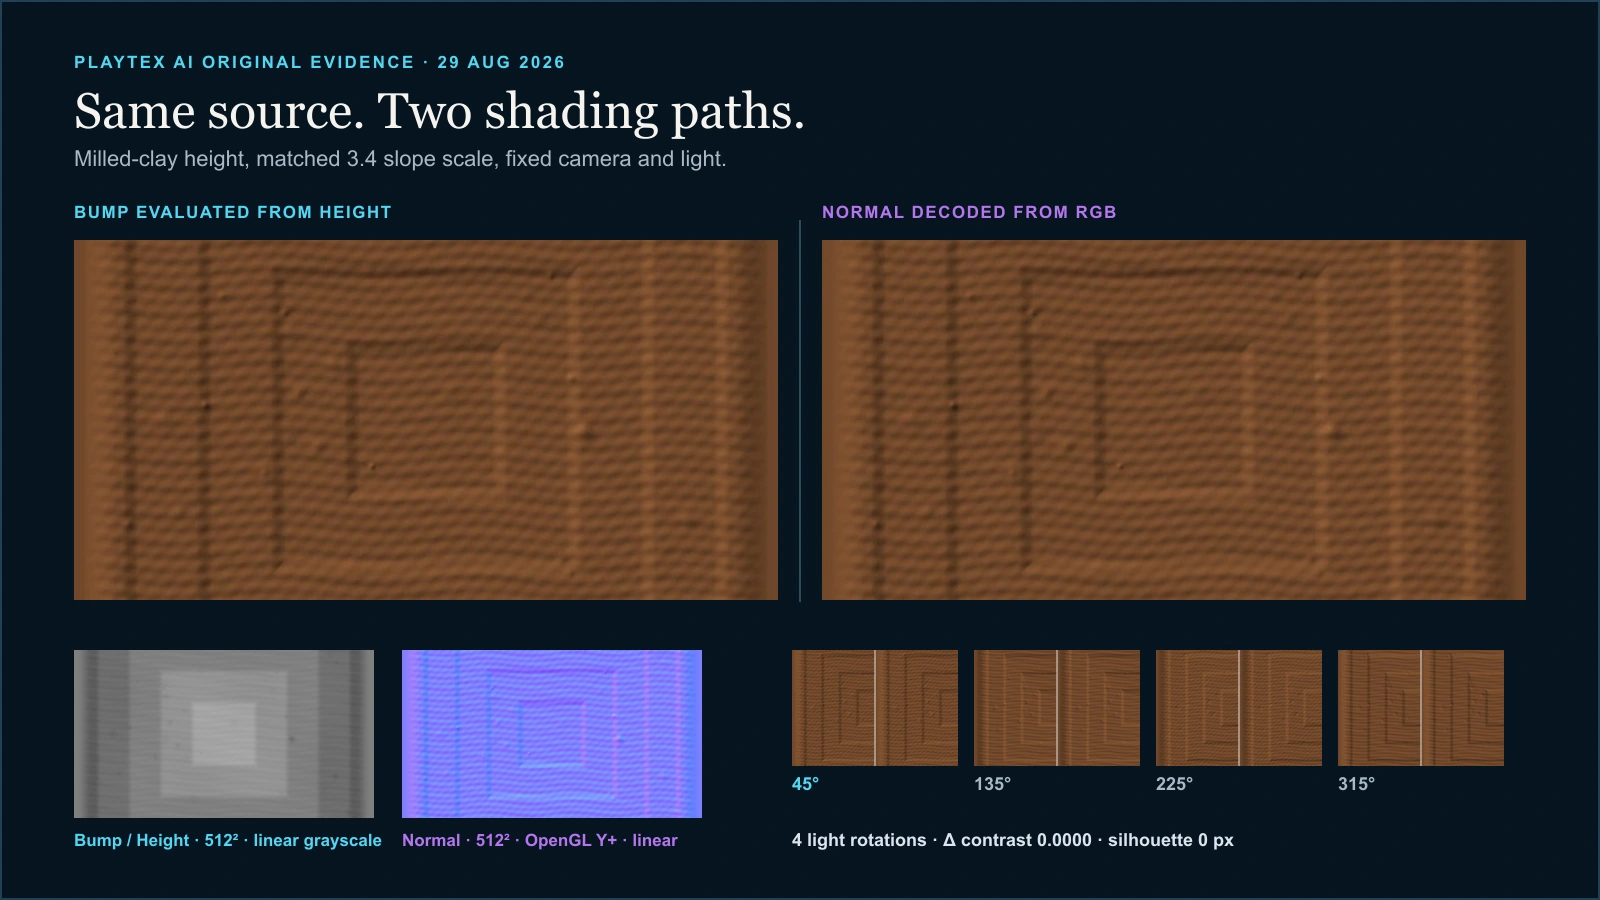
ZIP with the 512 × 512 grayscale bump/height PNG, OpenGL Y+ normal PNG, SHA-256 hashes, exact generation settings, measurements, and limitations.
Release notes
What changed?
- : Comparison guide and measured evidence published Added the canonical normal-versus-bump decision, a reproducible matched-response study, four lighting rotations, a silhouette check, and the downloadable source pair.
Direct answer
Should you use a normal map or a bump map?
Use a normal map when the destination expects tangent-space RGB directions, the relief is approved, or predictable directional shading must travel between tools. Use a grayscale bump map when the renderer has a bump or height input and you want to keep the scalar relief editable. In this guide, “bump map” means that grayscale height texture; some documentation uses “bump mapping” as the broader family that also includes normal mapping. Neither classic technique moves the mesh outline.
Guide owner versus tool owner: This page owns the Normal Map vs Bump Map decision and side-by-side evidence. Use Normal Map Generator for broader image-to-normal authoring, Height to Normal Map Converter when a finished grayscale bump or height source needs RGB tangent directions, PBR Map Generator for the coordinated material stack, and PBR Engine Converter for the final engine package.
What you will get
- Pick by renderer input, not appearance.
- Import both as linear data.
- Use geometry for silhouette.
Use each representation where it stays honest
- Use a normal map for approved grooves, pores, fasteners, bevel response, and other small lighting detail on a game-ready mesh.
- Keep a grayscale bump or height master while relief still needs painting, inversion, filtering, or conversion at a different texel scale.
- Use a bump map directly when the material node specifically accepts scalar height and its Strength, Distance, and filtering are part of the authored look.
- Use displacement or geometry when an edge, cast shadow, collision shape, or grazing-angle profile must physically change.
Acceptance test
Approve the asset only when these are true
- The destination shader input is confirmed as normal/vector or bump/height data.
- Normal, bump, and height textures bypass sRGB decoding and are imported as numeric data.
- The normal map uses the destination Y convention and a compatible tangent basis.
- Strength is approved under a rotating light at the final texel density and material scale.
- Compression and mipmaps preserve the intended slopes without sparkle, banding, or flattening.
- Silhouette-scale form is modeled or displaced instead of being delegated to bump or normal shading.
Normal maps store a result; bump maps store an input to a result
A tangent-space normal texel directly encodes the direction used to perturb lighting. A grayscale bump texel stores relative height, so the shader must compare the shading point with nearby height values before it has a direction. That makes a bump master easier to reshape, while a normal map is a more explicit delivery of approved slopes.
Normal maps also depend on the mesh tangent basis. The RGB values only become meaningful with the intended UVs, tangents, normals, and handedness. A bump field depends on UV scale and the renderer’s derivative or sampling method instead. Neither is context-free.
Matching strength requires a reference, not equal slider numbers
The evidence pair uses the same 3 × 3 Sobel derivative and a shared 3.4 slope scale before one path is encoded into RGB. That creates a controlled apparent-strength match. A Blender Bump Distance, a glTF normalTexture scale, a Unity bumpiness import value, and a custom shader multiplier are different controls; identical numbers do not guarantee identical slopes.
For production, hold material scale, camera, exposure, light elevation, and texture resolution fixed. Rotate the light, compare contrast and direction, and record the accepted renderer settings. Recheck after mip generation and compression because those steps can flatten or distort the response.
Storage and runtime cost are format decisions, not thumbnail facts
A grayscale file can still be stored as RGB, and a purple normal can be compressed into two channels with the third reconstructed. A scalar R8 or BC4 bump texture and a BC5 normal texture have different bandwidth and quality tradeoffs, but formats vary by platform. Shader work also varies: bump can require extra neighboring samples or derivatives, while normal mapping requires vector decode and normalization.
Do not publish one universal “faster” answer. Choose the semantic map first, select a supported GPU format second, and profile the shipping shader, mips, anisotropy, and target hardware.
Neither classic path changes the mesh outline
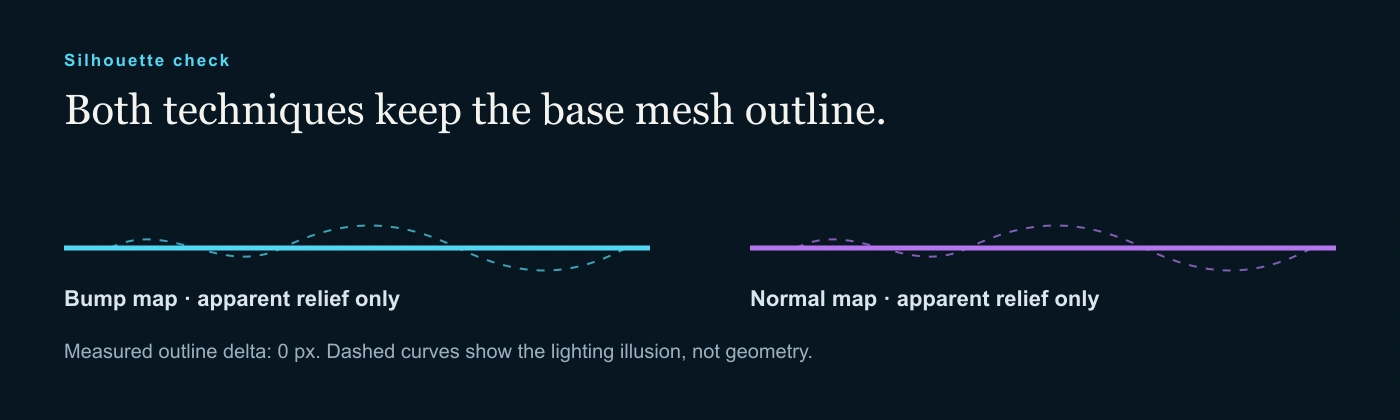
Normal and bump mapping perturb the shading normal. They can change highlights and the apparent direction of a small groove, but the base triangles stay where they are. At a grazing camera angle, the flat boundary reveals the illusion.
Use modeled geometry when the form affects collision, shadowing, edge highlights, or the asset profile. Use a displacement-capable path only when the renderer and mesh density support actual movement, and document the height midpoint plus scene-unit scale.
This page stops at the A-versus-B decision
The PBR Texture Maps Explained guide owns the full map taxonomy. The Game Developer’s PBR Texture Handbook owns the broader production and engine pipeline. This page owns only the normal-versus-grayscale-bump decision, matching evidence, import symptoms, and the handoff to the existing focused tools.
Use Normal Map Generator to author the chosen normal, Height to Normal Map Converter to convert a finished scalar source, PBR Map Generator to coordinate the remaining maps, and PBR Engine Converter to package the approved stack for a target renderer.
Signals, import flags, and renderer controls
What the file stores
The visible thumbnails are secondary. Choose by the numeric signal the shader will read.
- Grayscale bump / height: Stores one relative elevation value per texel. The bump shader samples nearby values or derivatives to infer a local direction. Keep this representation while relief is still being painted, inverted, filtered, or used by a height-aware node.
- Tangent-space normal: Stores X, Y, and Z surface-direction components in RGB, commonly remapped from −1…1 into 0…1. Use it when the destination exposes a normal input, directional detail is approved, and the mesh tangent basis is known.
- Precision: An 8-bit delivery map has 256 code values per stored channel; smooth height gradients can benefit from a higher-precision master before final export. Retain 16-bit or float height upstream when strong remapping or displacement is likely; quantize once for the target.
Import and orientation
Numeric maps need a data-aware import path and an explicit direction convention.
- Color space: Normal and bump/height values normally bypass the sRGB transfer function. They are numeric data, not display color. Use a Normal Map texture type, Non-Color, Masks/no-sRGB, or the equivalent documented by the destination.
- Normal Y convention: OpenGL-style Y+ and DirectX-style Y− tangent normals commonly differ in the encoded green component. Flip green once as a controlled test when vertical relief appears inverted; never flip the whole RGB image for a Y mismatch.
- Tangent basis and UVs: The same tangent-space RGB values are interpreted through mesh tangents derived from UVs and geometry. Lock triangulation, UV orientation, mirrored-island handling, and tangent generation when a baked normal changes across tools.
Strength, filtering, and delivery
A slider value is not a portable unit. Match the visual response under controlled conditions.
- Normal scale / strength: Often scales the decoded X and Y components before the direction is normalized, changing apparent slope. Set it with the final material scale and a rotating light; document the renderer value with the asset.
- Bump strength / distance: Changes how strongly local height differences perturb the shading normal; node units and filtering vary by renderer. Do not copy the same number between tools and expect the same result. Match response visually or from a shared derivative scale.
- Compression and mipmaps: Normal-aware two-channel formats and scalar one-channel formats can change memory, quality, and filtering; file size alone does not predict GPU cost. Inspect shipping mips at distance and grazing angles, use semantic compression, and avoid JPEG for either data map.
Choose, match, and verify the relief encoding
Choose a normal map for portable RGB surface directions. Keep a bump map when your shader accepts grayscale height or you still need editable relief. Neither changes silhouette.
Step 1: Read the destination input first
A Normal input expects encoded directions. A Bump or Height input expects one scalar field and derives a perturbed direction. Confirm the exact shader, renderer version, and import path before exporting either file.
Step 2: Preserve height while the shape is still changing
Paint, invert, blur, remap, or store higher precision in a grayscale master. Derive the tangent-space normal only after the relief scale and texel density are stable.
Step 3: Encode the approved surface direction
Generate the RGB normal, choose OpenGL Y+ or DirectX Y− for the destination, and keep the file in a linear or normal-map import path. Do not judge vector data by its purple thumbnail alone.
Step 4: Rotate one light and inspect the outline
Hold the camera, material, light elevation, color, and exposure fixed while rotating azimuth. Compare the highlight direction at 45°, 135°, 225°, and 315°, then check a grazing view. If the outline must move, switch to geometry or displacement.
Step 5: Finish the material and target package
Build only the other channels the shader consumes, then convert packing, filenames, normal orientation, and import notes for the destination. Profile runtime cost after the real texture format and shader graph are known.
Choose by the data your renderer consumes
| Decision | Normal map | Bump map |
|---|---|---|
| Stored signal | RGB tangent-space direction: X in red, Y in green, Z in blue. | One scalar height value, usually grayscale. |
| Best when | The shader expects a normal input and approved directional detail must travel with the asset. | The shader accepts height/bump, or scalar relief still needs editing. |
| Runtime work | Sample, decode, scale, and normalize according to the shader and compression format. | Sample height and derive slope from nearby values or screen/texture derivatives. Profile the actual graph. |
| Typical delivery | Normal-aware import, linear sampling, correct Y convention, often two-channel GPU compression. | Linear/non-color import, documented high/low direction, optionally one-channel GPU storage. |
| Common failure | Wrong green direction, tangent mismatch, sRGB decode, or destructive compression. | Inverted height, inconsistent node scale, banding, noisy derivatives, or tool-specific filtering. |
| Silhouette | No change in classic normal mapping. | No change in classic bump mapping. |
If it looks wrong, read the symptom
- Relief looks inverted: test the normal green/Y convention, or invert the grayscale height direction—not the whole normal RGB image.
- Surface sparkles after compression: reduce false high-frequency relief, use semantic normal/scalar compression, and inspect generated mips.
- It looks deep head-on but flat at the edge: that is the silhouette limit; use displacement or geometry if the profile matters.
- Bump strength changes between tools: node Distance, Strength, texel scale, units, and filtering are not standardized portable numbers.
- A mirrored UV island shades differently: verify the tangent basis, handedness, triangulation, and baker/renderer compatibility.
- The normal looks swollen or dull: disable sRGB, use a normal-map importer, confirm renormalization, and check that the blue/Z channel remains positive.
What is the main difference between a normal map and a bump map?
A normal map stores a three-component surface direction in RGB. A grayscale bump map stores scalar height, and the shader derives the direction from nearby height values. Both change lighting rather than mesh geometry in their classic forms.
Is a normal map a type of bump map?
Some renderer documentation uses bump mapping as the umbrella term for techniques that perturb shading normals, which includes normal maps. In file-production language, “bump map” usually means the grayscale height input and “normal map” means the RGB direction texture; this guide uses that practical distinction.
Which looks better, a normal map or a bump map?
Neither wins from the thumbnail alone. With matched slopes and filtering they can shade nearly identically, as the evidence pair shows. Choose the representation the shader consumes and the one that preserves the editing flexibility the asset still needs.
Should normal and bump maps use sRGB?
Normally no. They carry numeric direction or height data and should use a linear, Non-Color, Normal Map, or equivalent data path. The destination renderer documentation remains authoritative.
Can either map change the silhouette?
No, not with classic bump or normal mapping. Use modeled geometry or a displacement path that actually moves vertices or subdivided surface points.
Can I convert a bump map to a normal map?
Yes. A height-to-normal converter calculates local X and Y slopes from the grayscale field, adds positive Z, normalizes the vector, and encodes it in RGB. Choose the destination Y convention and verify the result under rotated light.
Is a bump map always cheaper than a normal map?
No universal answer is defensible. Texture channel count, GPU format, neighboring samples or derivatives, vector math, mipmaps, and the rest of the material graph all matter. Profile the final shader and target hardware.
Primary sources
Official specifications and renderer documentation
PLAYTEX AI guidance is paired with official specifications and platform documentation where the handoff depends on an outside convention.
- glTF 2.0 specification: tangent-space normal texture encoding and scale
- Blender 4.5 LTS manual: Bump node height sampling, Strength, Distance, and Filter Width
- Blender manual: Normal Map node and Non-Color tangent-space input
- Unity 6.1 manual: normal maps, height conversion, Y+ convention, and silhouette limits
- Unreal Engine 5.8: texture import normal detection and green-channel flip
- Unreal Engine 5.8: Texture Asset Editor normal-map mip normalization and compression controls
ZIP with the 512 × 512 grayscale bump/height PNG, OpenGL Y+ normal PNG, SHA-256 hashes, exact generation settings, measurements, and limitations.
Generate a normal mapOpen the live workflow that this guide is documenting.
PBR Texture Maps Explained: Albedo, Normal, Roughness, Metallic, AO, Height, and EmissionA PBR material separates visible surface properties into coordinated texture maps. Base color describes surface color, normal and height describe relief, roughness controls reflection spread, metallic classifies conductors, ambient occlusion adds limited local contact shading, and emission identifies self-lit regions.
The Game Developer's PBR Texture HandbookAs of August 2026, this handbook gives game developers and material artists one engine-aware PBR texture system: map semantics, base color and delighting, normals and height, roughness, metallic classification, support maps, seamless authoring, calibrated material families, controlled-light review, color space, formats, channel packing, eight renderer targets, runtime budgets, production QA, and troubleshooting.
What Is a Normal Map? How It Works and When to Use OneUnderstand how tangent-space direction data changes lighting across a low-detail mesh, when normal maps are the right tool, and how to avoid strength and Y-axis mistakes during engine import.
PBR Map Generator: Create Normal, Roughness, AO, Height, Metallic, and Emission MapsTurn one viable image or source-guided hybrid setup into a coherent map stack, review every channel as part of one material system, and export for the renderer you actually use.