Blender base-texture workflow
AI Texture Generator for Blender Materials
Invent the surface in PLAYTEX AI, prove the repeat, then use the downloaded PNG as a Blender material source.
Direct answer: Use PLAYTEX AI Texture Lab when a Blender material has no source image yet. Describe the surface, compare generated variations on a plane, cube, or sphere, choose the export size, and click Download PNG once. In Blender, load that PNG with an Image Texture node and connect it to Principled BSDF Base Color. The PNG is a generated base texture—not a complete PBR map set and not a World environment.
Reviewed:
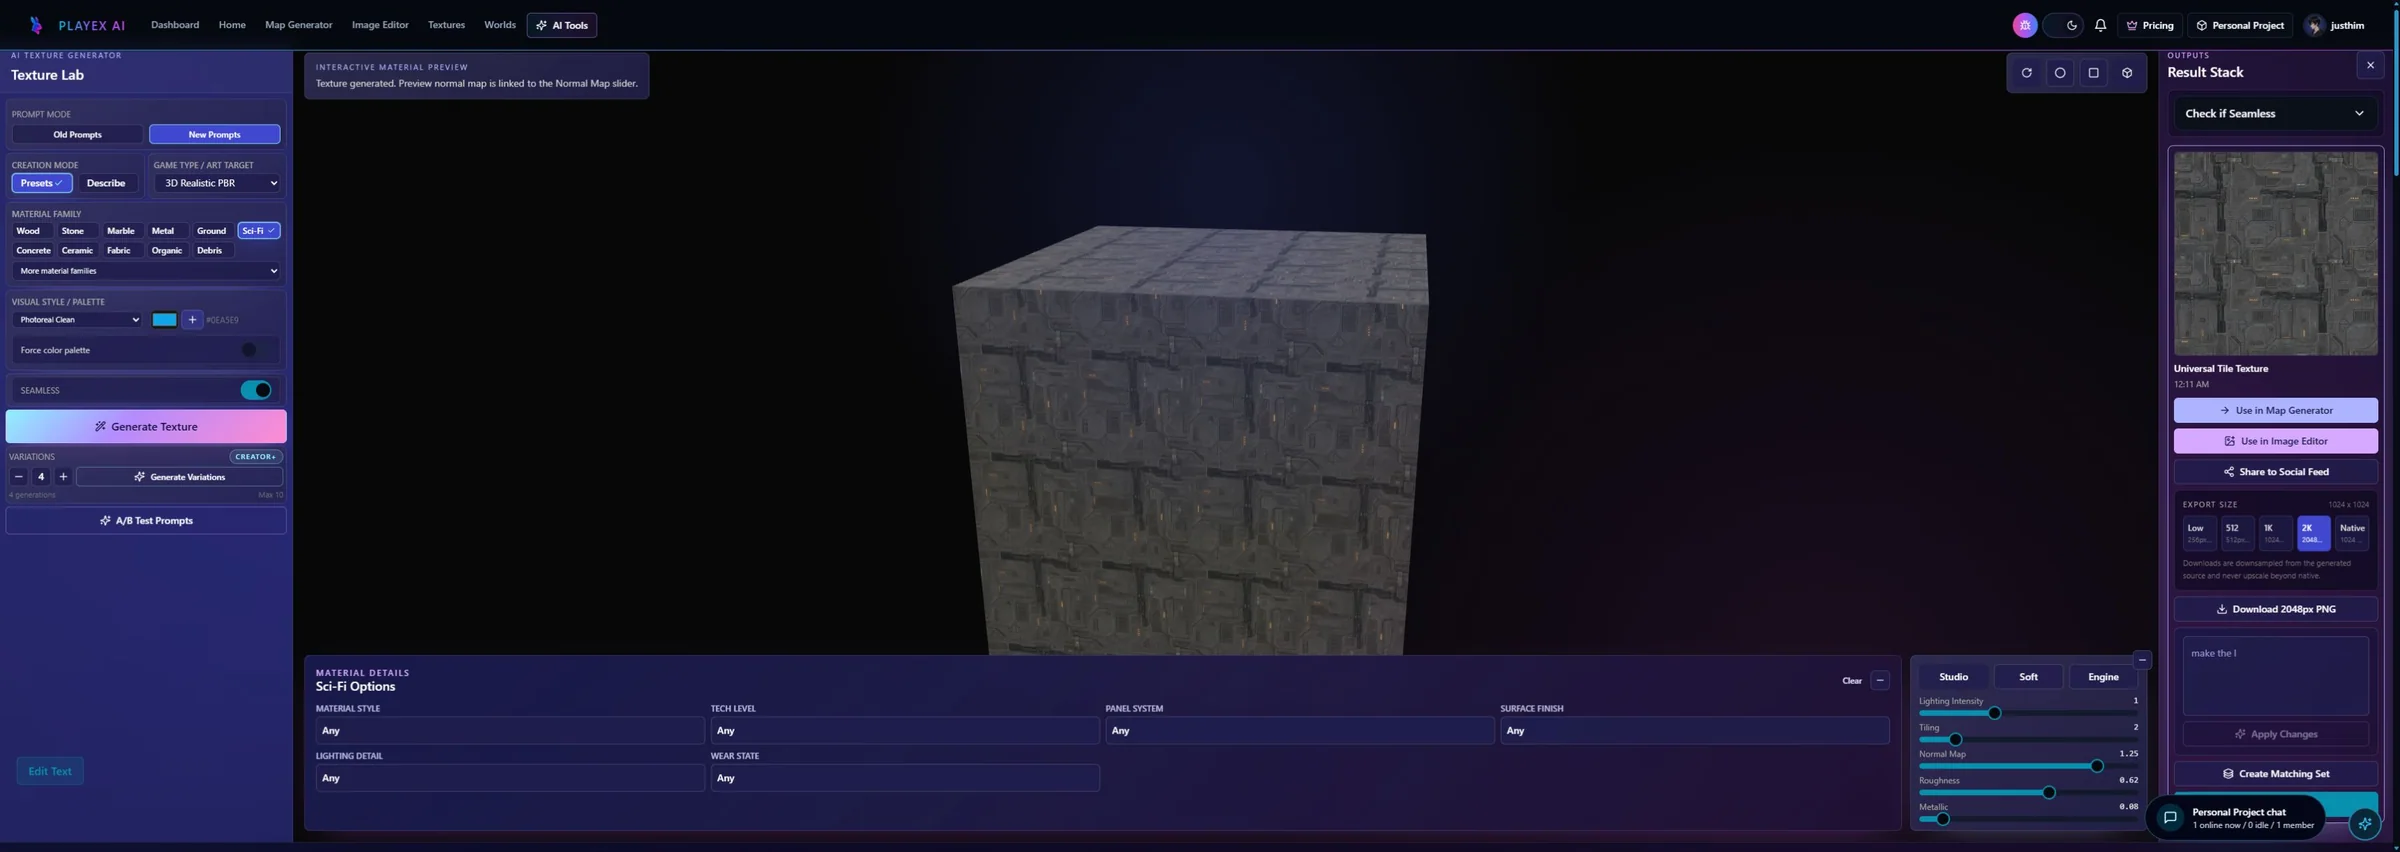
What this AI Texture Generator page covers
This page covers invention of the base color source. Use the Blender PBR page for normal, roughness, metallic, AO, height, and package export; use the Blender HDRI page for World lighting.
How to use AI Texture Generator with Blender
Describe a surface, not a finished scene
Name the material, pattern scale, wear, color range, and whether the result must repeat. Avoid asking for perspective, objects, text, dramatic shadows, or a horizon.
The generation brief describes texture data Blender can map across geometry.
Compare variants on the right preview mesh
Use a plane for repeat rhythm, a cube for hard corners, and a sphere for distortion. Use Vary or Create Matching Set only after one direction is worth keeping.
The selected source survives more than a single attractive thumbnail.
Choose size and download the PNG once
Select the required export resolution in Texture Lab and click Download PNG. Keep the clean master before Blender compression or resizing decisions.
A standalone base texture is ready for Blender import.
Apply with Image Texture and check UV scale
Load the PNG as color data, connect Color to Principled BSDF Base Color, and drive it with the object UV map. Use Mapping or UV editing to establish believable texel scale.
The AI source becomes a controllable Blender surface rather than a stretched image.
Where the generated PNG goes in Blender
Keep the source role explicit so a base texture is not mistaken for a technical map or an environment.
| PLAYTEX AI output | Blender destination | Verify in engine |
|---|---|---|
| Generated color PNG | Image Texture Color → Principled BSDF Base Color | Use color data; remove baked shadows that fight Blender lighting. |
| UV coordinates | Texture Coordinate UV → optional Mapping → Image Texture Vector | Check object scale, seam placement, and direction. |
| Later PBR maps | Dedicated nodes and Principled BSDF inputs | Use Non-Color for data maps and the Blender PBR workflow. |
What “one-click export” means here
After the result and resolution are selected, Download PNG saves the generated base texture in one click.
What remains after the click
It does not open Blender, create a .blend material, derive the PBR channels, or assign UVs.
Included in this handoff
- Selected generated texture
- Chosen PNG resolution
- Reusable source for Blender or a later PBR pass
Look development
Explore a material direction before committing to a measured or photo-based source.
Background assets
Create tileable walls, floors, cloth, painted surfaces, and stylized materials for props or sets.
PBR starting point
Approve a base source, then send it to the separate Blender PBR map workflow.
Pre-handoff QA
- No horizon, perspective object, text, or dramatic baked shadow appears in the texture.
- The tile rhythm holds on both a plane and a larger repeated field.
- The Blender object has useful UVs and believable material scale.
- The downloaded PNG is treated as color, not as a normal or roughness map.
AI Texture Generator and Blender FAQ
Can AI generate a complete Blender material from one prompt?
Texture Lab generates the base texture. A complete Blender PBR material still needs technical maps, node assignments, UV scale, and lighting validation. Continue to the dedicated Blender PBR map page when those channels are needed.
Why does the texture stretch on my Blender object?
The object may have missing or unsuitable UVs, or the Image Texture may be driven by the wrong coordinates. Unwrap the object and use UV or Mapping controls to set orientation and scale.
Is a generated square texture a Blender skybox?
No. A material tile covers object UVs. A Blender World environment requires full spherical coverage, normally a 2:1 equirectangular image loaded through an Environment Texture node. Use the Blender HDRI workflow for that asset.
Can I make matching normal and roughness maps later?
Yes. Approve the generated base PNG, then use the dedicated PBR Map Generator and Blender preset so the technical channels remain aligned.
Image Texture supplies image data to a shader
Blender documents Image Texture as the node used to load an image for shading, with vector inputs that can come from UV or generated coordinates.
Principled BSDF is the material destination
Blender exposes Base Color and the separate physical material inputs through Principled BSDF, which is why this color PNG is only one part of a full material.
Mapping controls location, rotation, and scale
Blender documents the Mapping node for transforming texture coordinates before they reach the texture node.