PBR Fundamentals
What Is a Roughness Map?
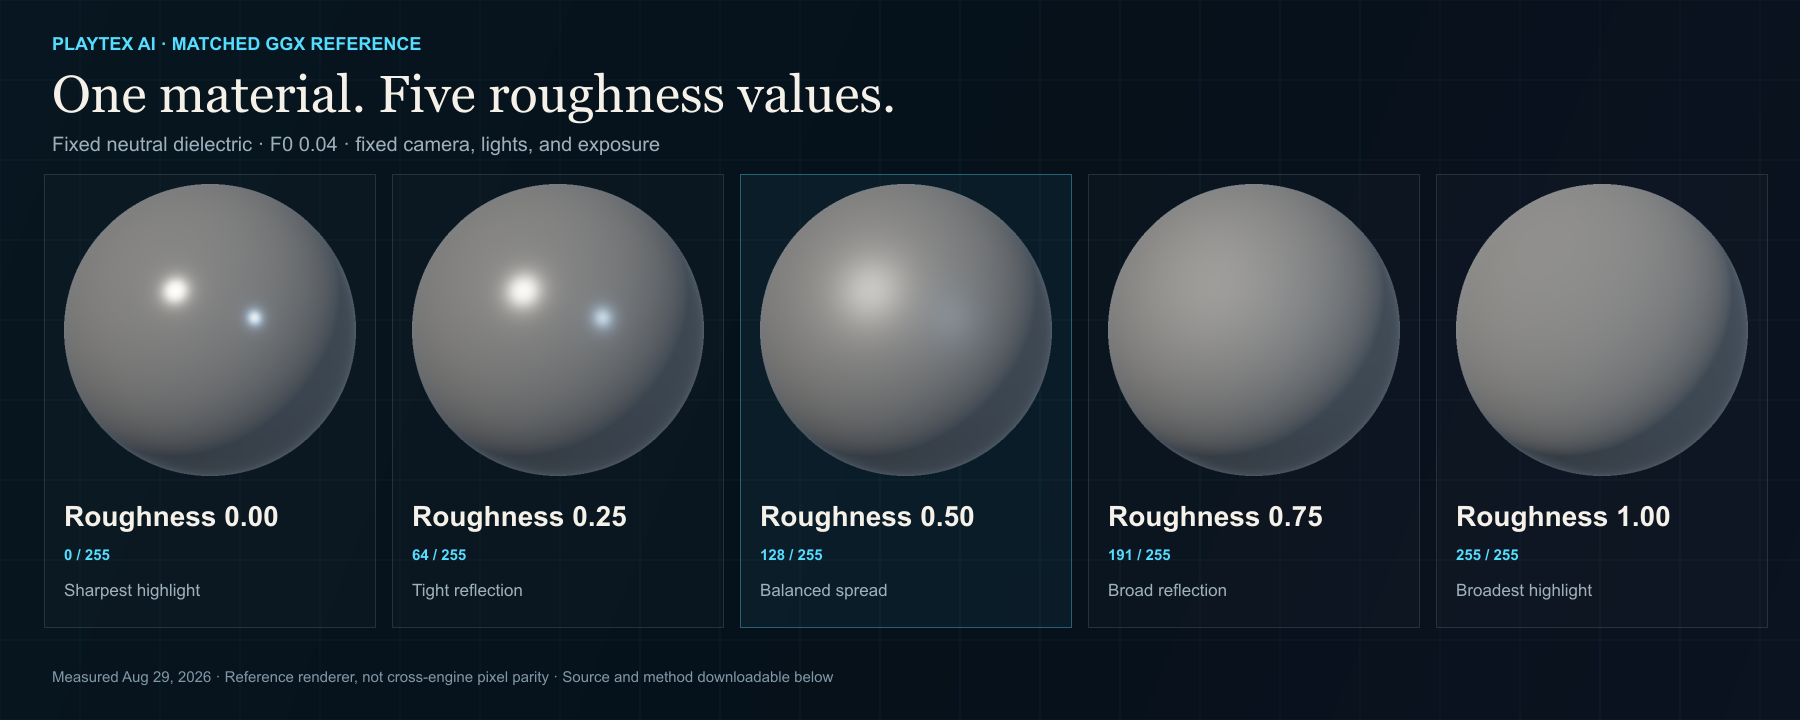
A roughness map stores a 0–1 value per texel that controls how narrowly or broadly a material’s specular reflection is distributed. Black (0) is smooth with a tight, sharp highlight; white (1) is rough with a broad, lower peak. It does not by itself decide whether a surface is metal or set a dielectric’s base reflectance.
Release notes
What changed?
- : Original matched-reference study published Added five fixed-value sphere renders, a reproducible GGX reference method, an exact roughness/smoothness inversion download, and current engine handoff notes.
Direct answer
What does a roughness map change?
A roughness map is a scalar material-data texture: lower values keep reflected light concentrated, while higher values spread the same reflection over more directions. Read it as surface microscale variation—not as paint color, brightness, metalness, or a standalone measure of how reflective a material is.
Definition, authoring, and delivery stay separate: This guide owns the exact definition, value behavior, and diagnosis. PBR texture maps explained covers the wider map stack. Roughness Map Generator authors and previews the scalar map, PBR Map Generator builds a coordinated material set, and PBR Engine Converter prepares engine-specific delivery.
What you will get
- Predict how values from 0 to 1 change highlight width and peak brightness.
- Separate roughness from smoothness, metalness, specular F0, and source-image brightness.
- Diagnose inversion, color-space, channel-packing, and compression mistakes before engine delivery.
Where a roughness map earns its memory
- Explaining why an otherwise correct material looks mirror-like, plastic, chalky, or uniformly dull.
- Translating a roughness source into a renderer that expects smoothness or glossiness.
- Choosing a channel and color-space setting for Blender, Unity, Unreal Engine, Roblox, or glTF.
- Reviewing generated roughness before it is packed into an ORM, mask, or engine-specific texture.
Acceptance test
Approve the asset only when these are true
- The map is imported as non-color / linear data, with no sRGB transfer curve.
- Black-to-white values produce the intended sharp-to-broad reflection response in the destination shader.
- Roughness and smoothness are inverted only once, at a documented handoff step.
- Compression and mipmaps do not erase small roughness changes or create block-shaped highlights.
- The result is judged on a lit material under neutral and production lighting—not from the grayscale thumbnail alone.
Roughness describes microscopic normal variation
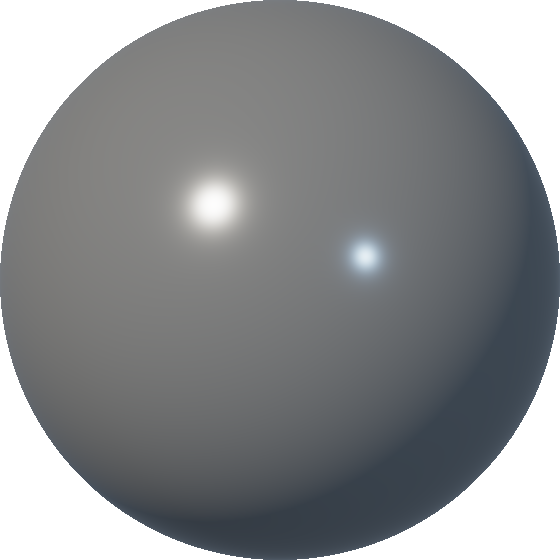
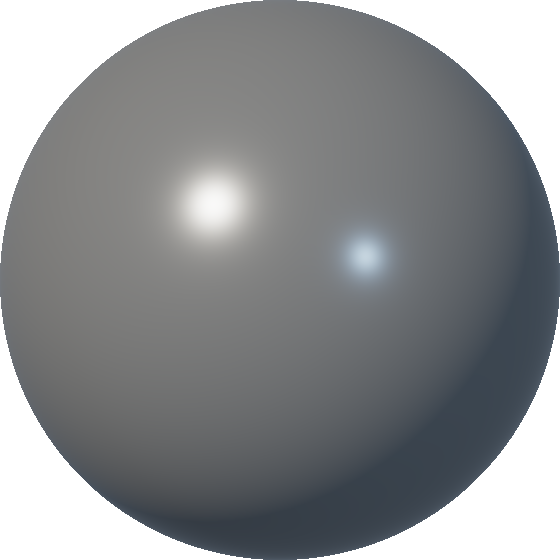
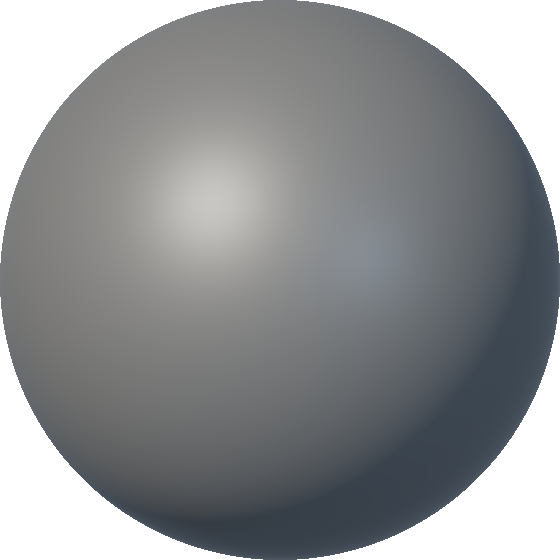
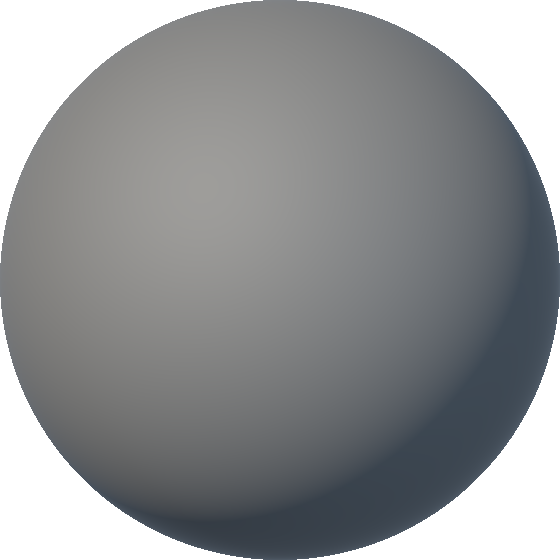
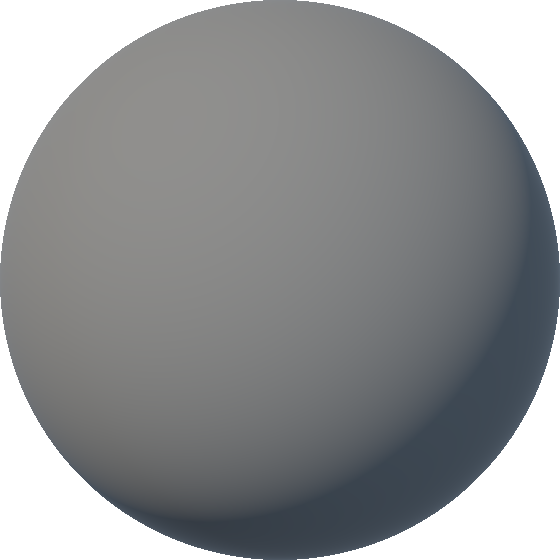
A PBR shader treats a surface as a distribution of tiny facets. On a smooth region those facets point in similar directions, so reflected light stays concentrated. On a rough region their directions vary more, so the reflection spreads across a larger angle. The mesh and normal map can stay identical while the highlight changes dramatically.
That model explains why the grayscale image is only an instruction. Black pixels do not paint black onto the object, and white pixels do not add white color. Each pixel supplies a number to the material’s reflection model.
Highlight width is not the same as base reflectance
Raising roughness generally makes the brightest part of a highlight lower because the reflection is distributed over more directions. That visual change is easy to misread as lower reflectivity, but roughness is not the only variable. Dielectric F0, metalness, conductor color, Fresnel, light size, environment intensity, exposure, and tone mapping all participate.
For diagnosis, lock those variables before comparing roughness. The five reference spheres on this page hold the material class, F0, camera, lights, and exposure constant so only the roughness input changes.
Roughness and smoothness are naming conventions around one signal
A roughness workflow reads 0 as smooth and 1 as rough. A smoothness or gloss workflow reverses that direction. Converting between them is simple, but pipeline mistakes happen when a map is inverted twice or when a packed channel is mislabeled.
Keep one canonical roughness source when possible. Derive smoothness at the documented export boundary, name the output with its channel, and retain the inversion test beside the delivery files.
Color management can silently reshape the material
Display-color textures use an sRGB transfer curve so their stored values look right on a screen. Roughness values are shader parameters, so they should reach the shader without that display transform. If a mid-gray byte is decoded as sRGB color, the numeric value changes and the highlight no longer matches the authored intent.
The same rule applies when roughness is packed into a channel with AO or metalness. Treat the packed texture as linear material data even if the combined RGB thumbnail happens to look colorful.
Compression and mipmaps are part of the roughness result
A lossless source PNG does not guarantee unchanged runtime data. GPU compression can quantize gradients or introduce block structure, and mipmaps blend nearby texels as the surface recedes. Those changes can flatten intended variation or make highlights shimmer.
Approve the source, then inspect the imported and shipping formats at representative distances. The destination renderer remains the final authority because its BRDF, environment prefiltering, normal filtering, exposure, and tone mapping determine the visible outcome.
Controls and handoff settings that actually change roughness
Value shaping
These controls change the scalar range before any engine-specific packing.
- Black point: Moves the lowest source values toward roughness 0, concentrating their reflections. Raise it only when the material has no genuinely polished areas and dark noise is producing pin-sharp sparkles.
- White point: Defines which source values reach roughness 1 and therefore the broadest response. Lower it when the roughest regions never become broad enough under controlled lighting.
- Contrast: Separates or compresses local roughness differences around the middle of the range. Use modestly; excessive contrast creates binary wet/dry patches and unstable highlights at distance.
Direction and preview
These settings decide what the bytes mean and how you judge them.
- Roughness output: Keeps black smooth and white rough. Use for glTF metallic-roughness, Unreal Engine Roughness, Blender Principled Roughness, and any shader documented with that convention.
- Smoothness output: Inverts each value so white is smooth and black is rough. Use only when the destination explicitly requests smoothness or gloss, such as the smoothness alpha in Unity’s built-in Standard metallic workflow.
- Lit sphere: Applies the current scalar map to a fixed neutral dielectric under fixed lighting. Use it to compare highlight spread. Confirm the final result in the destination renderer because environment filtering and tone mapping differ.
Import and delivery
A correct source can still fail when the texture importer changes its bytes.
- Non-color / linear sampling: Preserves scalar values instead of decoding them as display color. Set it for standalone roughness, smoothness, and packed data textures. An sRGB decode shifts midtones and changes the material response.
- Packed channel: Stores roughness or smoothness in a designated R, G, B, or A channel. Match the shader contract exactly—for example, glTF roughness uses green, while a Unity metallic map can store smoothness in alpha.
- Compression and mipmaps: Reduce file or GPU cost but can quantize values, blend texels, and reshape tiny highlight changes. Inspect representative camera distances and reduce destructive compression when gradients band, blocks appear, or microvariation shimmers.
Author roughness without losing the material signal
A roughness map stores a 0–1 value per texel that controls how narrowly or broadly a material’s specular reflection is distributed. Black (0) is smooth with a tight, sharp highlight; white (1) is rough with a broad, lower peak. It does not by itself decide whether a surface is metal or set a dielectric’s base reflectance.
Step 1: Confirm the destination convention first
Find out whether the shader expects roughness directly, smoothness, glossiness, or a packed channel. Write the expected channel and import color space beside the asset before editing pixels.
Step 2: Create a restrained scalar starting point
Use Roughness Map Generator to turn source variation into a grayscale roughness interpretation. Source brightness can suggest changes, but a photograph does not directly measure microscopic roughness, so review the result as authored data.
Step 3: Tune values while watching a lit material
Adjust black point, white point, and contrast in small moves. Switch between the scalar map and the fixed lit-sphere preview: the map shows data; the sphere shows the reflection response that matters.
Step 4: Invert once when the target expects smoothness
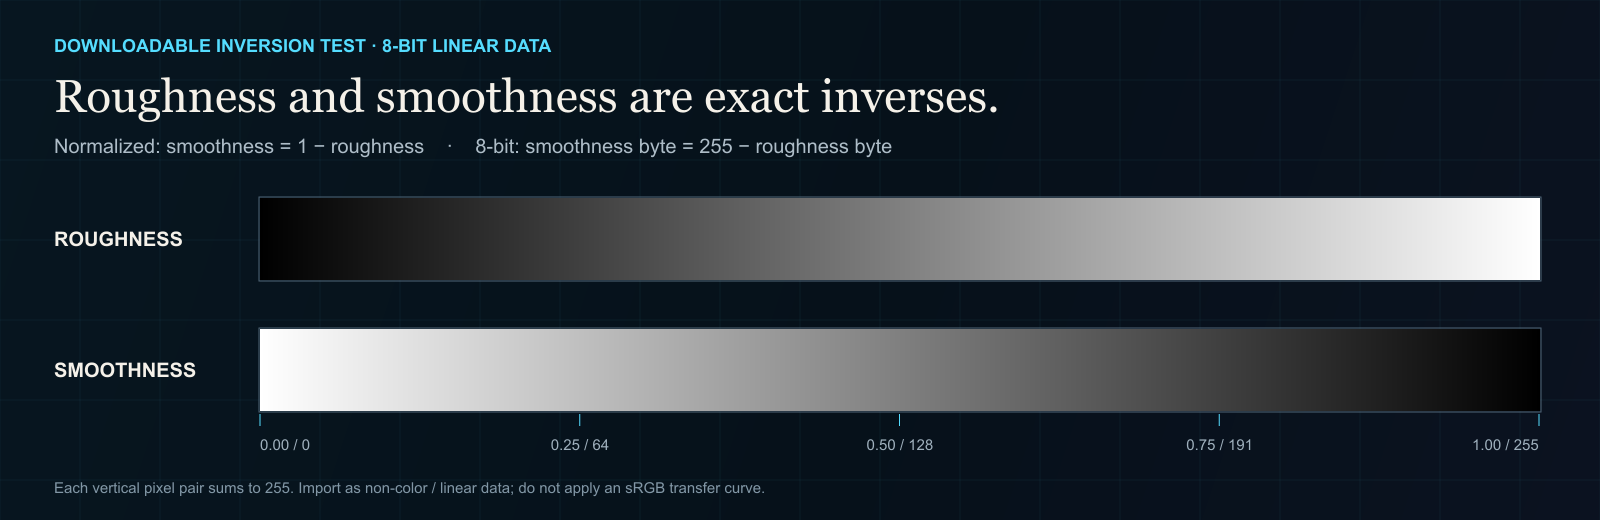
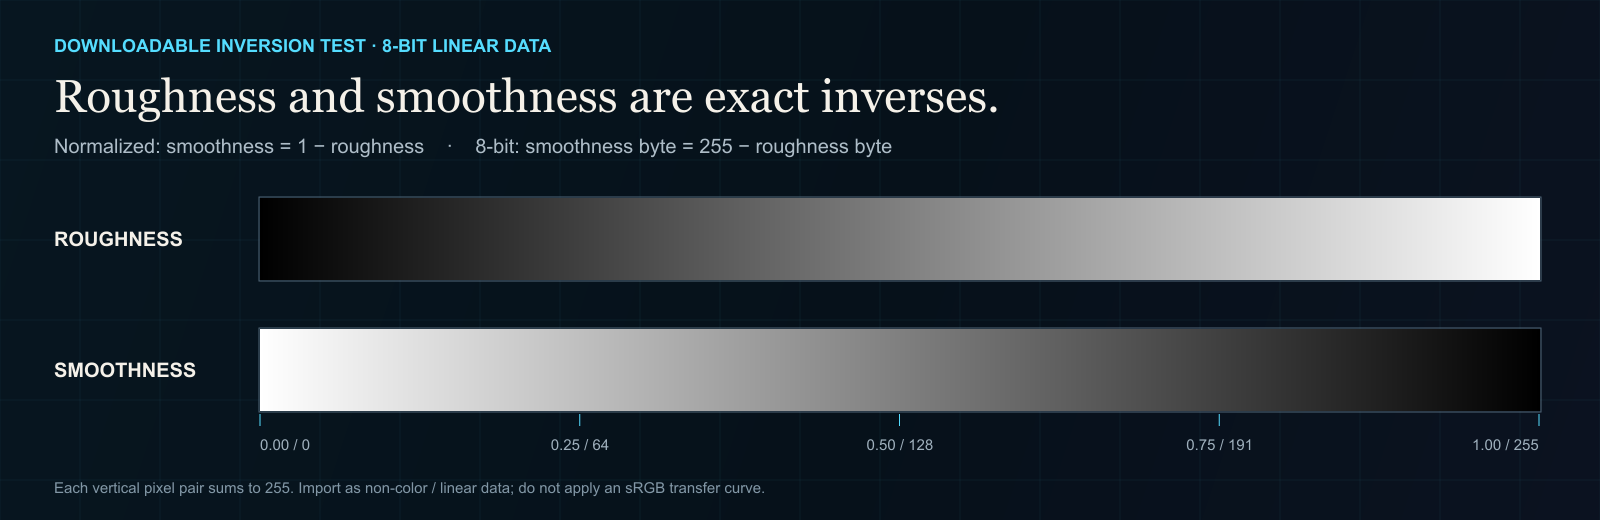
Use smoothness = 1 − roughness in normalized data, or smoothness byte = 255 − roughness byte in 8-bit data. Download the exact inversion test below and keep the conversion at one documented step.
Step 5: Pack, import, and prove the shipping result
Build the coordinated set in PBR Map Generator, then use PBR Engine Converter for the destination convention. Recheck the lit result after channel packing, runtime compression, and mip generation.
Engine and format roughness handoff
| Target | Expected signal | Common location | Import note |
|---|---|---|---|
| Blender 5.1 Principled BSDF | Roughness: 0 smooth → 1 rough | Roughness input | Set Image Texture color space to Non-Color |
| Unreal Engine 5.8 | Roughness: 0 mirror-like → 1 matte | Roughness input or packed mask channel | Disable sRGB for scalar / mask data |
| Unity 6.0 built-in Standard metallic workflow | Smoothness: 0 rough → 1 smooth | Metallic map alpha | Invert canonical roughness once before packing |
| glTF 2.0 metallic-roughness | Roughness: 0 smooth → 1 rough | metallicRoughnessTexture green channel | Linear material data; blue stores metalness |
| Roblox SurfaceAppearance | Roughness: 0 sharp → 1 matte | RoughnessMap | Test the uploaded asset because platform processing can affect it |
Diagnose the symptom before repainting the map
- The material is glossy everywhere: check for an accidental smoothness-as-roughness input, an sRGB decode, or a roughness channel that was never connected.
- The material is chalky or flat: check for a double inversion, values pushed too close to white, missing reflections, or exposure that hides the specular lobe.
- Highlights break into square patches: inspect block compression and confirm the packed texture uses a suitable data format.
- Fine roughness sparkles or crawls at distance: review mip filtering, minification, texture resolution, and overly high local contrast.
- A grayscale map copied from the photo looks plausible but lights incorrectly: brightness is not a direct roughness measurement; author by material behavior and reference.
- Changing roughness seems to change reflectivity: the peak becomes dimmer as energy spreads, but metalness, base reflectance, Fresnel, lighting, and tone mapping still control the observed result.
What is a roughness map in one sentence?
A roughness map is a scalar, linear-data texture that varies the width of specular reflections across a PBR material: lower values are smoother and sharper; higher values are rougher and broader.
Is white rough or smooth in a roughness map?
White is rough and black is smooth when the texture is truly a roughness map. A smoothness or gloss map uses the opposite direction, so always confirm the shader label instead of trusting the filename.
Are roughness and smoothness exact inverses?
Yes for the normalized convention: smoothness = 1 − roughness. In an 8-bit texture, the exact byte inversion is 255 − the roughness byte. A renderer may remap perceptual roughness internally, but the handoff inversion is still defined at the texture-value level.
Should a roughness map use sRGB?
No. Roughness is numeric material data and should normally be sampled as non-color / linear data. An sRGB decode changes midrange values before the shader uses them.
Can a roughness map be colored?
A standalone roughness signal is one scalar value per texel, so grayscale is the clearest representation. A file can contain the signal in one channel of a colored packed texture, but only the documented channel should drive roughness.
Does a roughness map control how reflective a surface is?
Not by itself. Roughness mainly changes how reflected energy is distributed, which changes highlight width and apparent peak brightness. Metalness, dielectric F0 or specular settings, Fresnel, the environment, exposure, and tone mapping also affect the visible reflection.
Can image brightness generate physically correct roughness?
No. A single RGB photograph mixes base color, lighting, exposure, shadows, and reflections; it does not directly measure microscopic surface slope. Brightness can seed an editable interpretation, but material references and a lit review are still required.
Which channel stores roughness in a glTF metallic-roughness texture?
glTF 2.0 stores roughness in the green channel and metalness in the blue channel of metallicRoughnessTexture. The texture is material data, not display color.
Primary sources
Official specifications and renderer documentation
PLAYTEX AI guidance is paired with official specifications and platform documentation where the handoff depends on an outside convention.
- Khronos glTF 2.0 specification · metallic-roughness material
- Epic Games · Material Inputs in Unreal Engine
- Unity 6 Manual · Standard Shader metallic parameter and smoothness
- Blender Manual · Principled BSDF roughness
- Blender Manual · Color spaces and Non-Color data
- Roblox Creator Hub · SurfaceAppearance PBR maps
Open the live workflow that this guide is documenting.
PBR Texture Maps Explained: Albedo, Normal, Roughness, Metallic, AO, Height, and EmissionA PBR material separates visible surface properties into coordinated texture maps. Base color describes surface color, normal and height describe relief, roughness controls reflection spread, metallic classifies conductors, ambient occlusion adds limited local contact shading, and emission identifies self-lit regions.
The Game Developer's PBR Texture HandbookAs of August 2026, this handbook gives game developers and material artists one engine-aware PBR texture system: map semantics, base color and delighting, normals and height, roughness, metallic classification, support maps, seamless authoring, calibrated material families, controlled-light review, color space, formats, channel packing, eight renderer targets, runtime budgets, production QA, and troubleshooting.
How to Create PBR Textures: A Production Workflow from Source to EngineCreate a PBR texture by preparing a neutral, tile-safe source; deriving a coordinated map set; reviewing each channel as data and as a lit material; validating dimensions, normals, seams, and classifications; then exporting with the destination engine’s color-space, normal, and packing conventions.
PBR Map Generator: Create Normal, Roughness, AO, Height, Metallic, and Emission MapsTurn one viable image or source-guided hybrid setup into a coherent map stack, review every channel as part of one material system, and export for the renderer you actually use.